How to Customize Cars in Car Parking Multiplayer 2 (2026 Guide)
⏱ Read Time: 8 Minutes | 📱 Platform: Android | ✅ Updated: August 2026
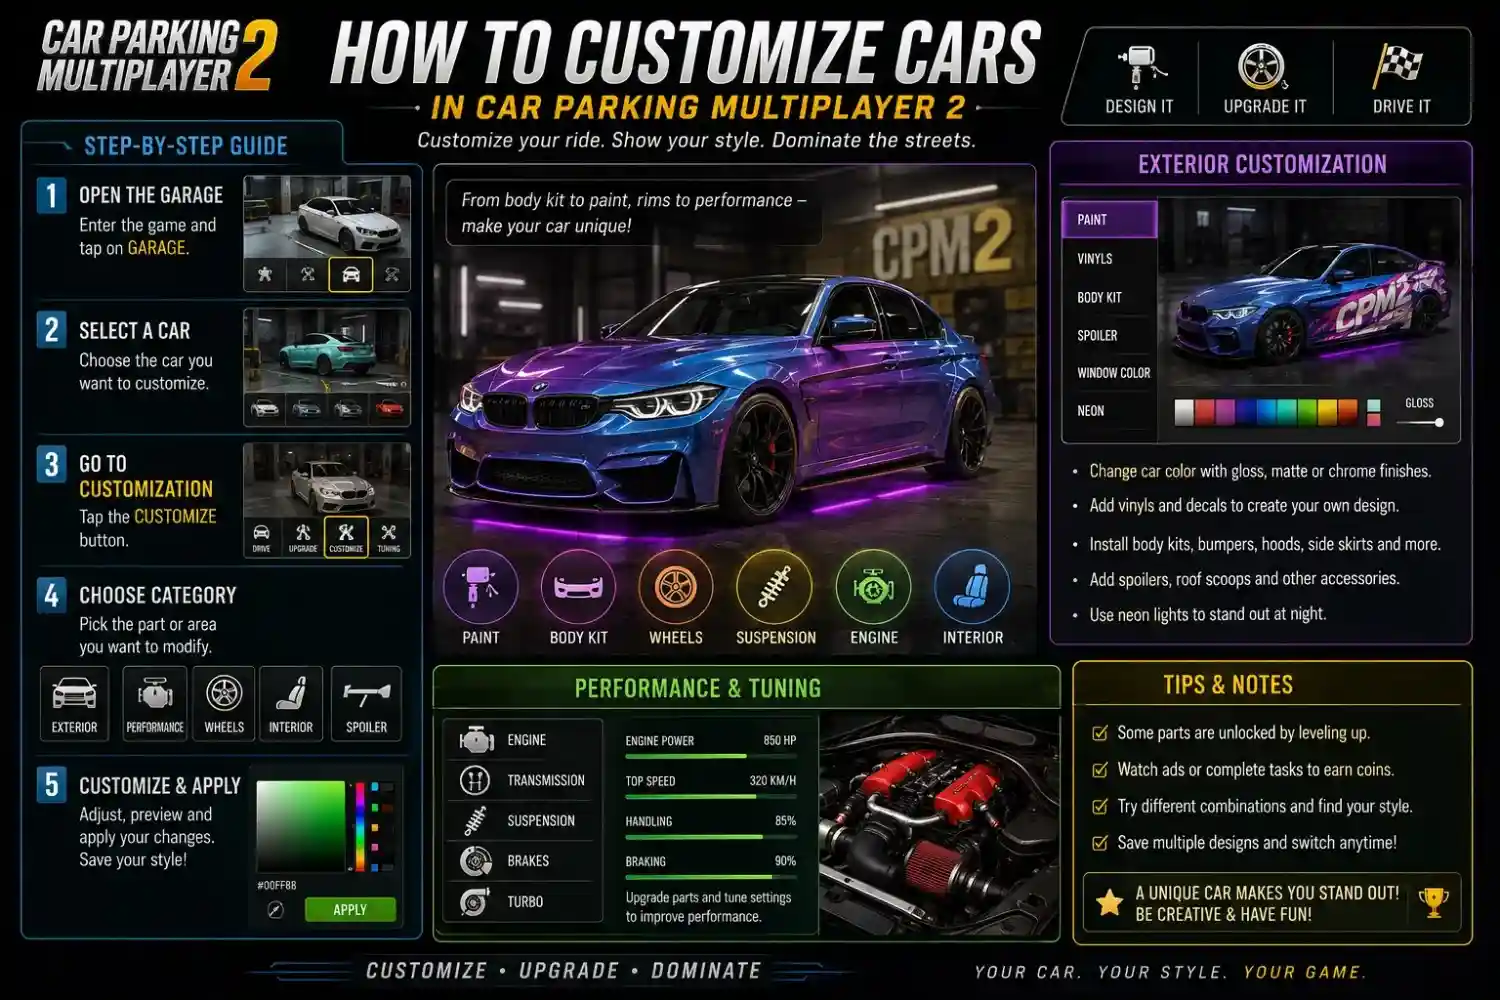
How to customize cars in CPM 2 starts with understanding that customization is where Car Parking Multiplayer 2 stops being just a driving game and becomes a place to build something that is genuinely yours. Paint, body kits, wheels, lighting, and interior parts combine into builds that other players notice the moment you pull into a server. This guide walks through the actual process of customizing a car in CPM 2, from opening the right menu to putting together a build with a consistent theme.
This guide covers the visual and cosmetic side of customization specifically. If you are trying to decide which car to build around, our best cars guide breaks down which vehicles have the deepest modification catalogues. If you are here for lap times rather than looks, our tips and tricks guide covers performance tuning priority in full.
Quick answer: Customize a car in CPM 2 by opening the garage menu and selecting your vehicle, then working through the Paint, Body Kit, Wheels, Lighting, and Interior tabs in that order so later choices build on earlier ones rather than clashing with them. Save your build once finished so you can switch between multiple saved looks without redoing any of the work.
⬇ Download CPM 2 Latest Version
How to Customize Cars in CPM 2: Finding the Menu
Open your garage from the main menu and select the vehicle you want to work on. The wrench icon on the vehicle’s info screen opens the full customization panel, organized into tabs for paint, body parts, wheels, lighting, and interior. Everything you apply here updates in real time on the 3D model, so you can rotate the car and check how a part looks before committing coins to it.
Not every part is available on every car. Aftermarket-friendly vehicles, generally Japanese sports cars and a handful of European models, carry far larger catalogues of body kits and wheel options than economy cars do. If a part you want is not showing up, it is worth checking whether a different base vehicle supports it before assuming it is locked behind a level requirement.
Paint Jobs and Wraps
Paint is the first decision worth making because every other part, wheels especially, reads differently against different base colors. The Paint tab offers solid colors, metallic and pearlescent finishes, and matte options, plus a custom color wheel if you want an exact shade rather than a preset.
Wraps and liveries sit in the same tab and let you apply patterns, racing stripes, or a fully custom design over the base paint. The livery editor supports layered shapes and text, which is how most of the branded and sponsor-style liveries you see in multiplayer servers are actually built. Start with two or three colors maximum on a custom livery, since designs with too many competing elements tend to look busy rather than deliberate once applied to the full body.
Body Kits and Aero Parts
Body kits change the car’s actual silhouette rather than just its surface, and they are usually the single most expensive customization category. Front and rear bumpers, side skirts, and wide-body fenders are typically sold as separate pieces rather than a single bundle, which means you can mix parts from different kit lines if the game allows it on that vehicle rather than being locked to one manufacturer’s complete look.
Hoods, spoilers, and splitters fall under the same tab and are worth previewing on the 3D model before purchase, since aggressive aero pieces can look disproportionate on smaller hatchbacks even when the exact same part looks correct on a wider sports car. Rotate the car fully and check the profile view specifically, since most players only ever check the three-quarter angle shown by default and miss how a part sits from directly the side.
Wheels, Rims, and Stance
Wheels affect a build’s overall impression more than almost any other single part, since they are visible from every angle and set the tone for the whole car. The Wheels tab lets you pick a rim design, adjust diameter, and choose a finish separately from tire type, so the same rim shape can look completely different in gloss black versus chrome.
Camber and ride height sliders sit alongside the wheel options and control the stance look separately from any performance suspension tuning. Pushing camber and ride height to their extremes gives the aggressive stance look popular at car meets, but pulling them back closer to stock keeps the car looking more natural if that fits your build better. Neither slider affects handling, since that is controlled by the separate suspension tuning covered in our tips and tricks guide.
Window Tint and Lighting
Window tint is a small detail that has an outsized effect on how finished a build looks, since factory-clear windows tend to make even an otherwise complete build read as unfinished. Tint percentage is adjustable on a slider, and darker is not automatically better, since very dark tint can hide interior work you may have spent coins on.
Underglow and interior lighting are set from the same tab and let you pick colors independently for underbody, interior ambient, and headlight tint. A single consistent light color across all three tends to look more intentional than mixing several bright colors, especially in the free roam night cycle where lighting is far more visible than during the day.
Interior and Final Details
Interior customization covers seats, steering wheel, dashboard trim, and gauge cluster style, all accessed from the cockpit camera view within the customization panel. These parts matter less for exterior screenshots but are what other players actually see when they sit in your car during a multiplayer session, which happens more often than you might expect in an active server.
License plates and small decals are the last tab and the easiest to skip, but they are also the cheapest way to add a personal signature to a build once everything else is finished. A custom plate text or a small decal placed deliberately reads as more considered than leaving the default plate in place, which is an easy tell that a build was not fully finished.
Building a Cohesive Style
Builds that stand out in CPM 2 usually commit to one clear direction rather than borrowing a bit from every style available. A few recognizable directions worth picking from before you start spending coins:
- JDM street style — wide body kits, aggressive camber, single bold accent color, low-profile tires.
- Stance — extreme ride height reduction, deep-lip wheels, minimal aero, clean single-tone paint.
- Luxury — factory-adjacent body lines, tasteful wheel upgrades, subtle tint, premium interior trim.
- Off-road — raised ride height, larger wheels and tires, roof racks and light bars where available.
- Race livery — sponsor-style decals, matte or satin paint, functional-looking aero rather than purely cosmetic pieces.
Save your finished build under a descriptive name once you’re happy with it. CPM 2 supports multiple saved builds per vehicle, so you can keep a race livery and a show build on the same car without redoing either one from scratch.
Presenting Your Build at Car Meets
Once a build is finished, how you show it off matters almost as much as the build itself. Park at a slight angle rather than straight on when other players are viewing your car, since most in-game cameras capture the front three-quarter view best and a straight-on park hides the side profile work entirely.
Lighting in the environment changes how paint and wraps read, so a build that looks great in daytime free roam can look flat under a car meet server’s night lighting. If you built around a specific look, check it under both lighting conditions before deciding it’s finished, since the difference is often larger than expected.
For the etiquette side of car meets, including how build presentation affects your standing in a server community over time, our tips and tricks guide covers that in its multiplayer section.
🚀 Download CPM 2 and Start Building
Conclusion
That covers how to customize cars in CPM 2 from opening the garage menu through paint, body kits, wheels, lighting, interior, and picking a style direction that actually holds together. Work through the tabs in order, save your build once it clicks, and take a second look at it under both day and night lighting before calling it finished.
Frequently Asked Questions
Q: Where is the customization menu in CPM 2?
Open your garage, select a vehicle, and tap the wrench icon on its info screen to open the full paint, body kit, wheel, lighting, and interior panel.
Q: Do camber and ride height affect handling?
No, the stance sliders in the customization panel are cosmetic only. Actual handling is controlled by separate suspension tuning, covered in our tips and tricks guide.
Q: Which car has the best customization options?
Japanese sports cars generally carry the deepest modification catalogues, followed by select European models. See our best cars guide for the full breakdown by vehicle.
Q: Can I save more than one custom build per car?
Yes. Save each finished build under a descriptive name so you can switch between them, such as a race livery and a show build, without redoing either one.